Perspectives
A perspective is a task layout over the same Twin. Switching from View to Build, Analyze, Editor, or ∿ Lunica does not reload the scene, reset the simulation, or duplicate your project. It changes which tools are docked and what the center of the window is for.
The title bar pins the five main tasks. View → Perspectives lists those tasks plus specialist presets such as Terrain and Keybindings, and any tasks contributed by the Twin.
-
◉ View
Operate and present the running Twin.
-
↗ Analyze
Compare signals and inspect live port values.
-
⚒ Build
Compose and tune the live scene.
-
✎ Editor
Edit one explicit USD document in isolation.
-
∿ Lunica
Develop, compile, and run Modelica models.
-
↻ Switch layouts
Preserve the Twin, documents, and simulation.
Analyze is the built-in label for analytics work; there is no separate Analytics tab.
Switch and recover a layout
Select a title-bar tab, or choose View → Perspectives and pick a task. Compact windows collapse the tabs into a picker. Switching perspectives preserves the Twin and the simulation; layout changes stay with their task. Switching does not start or stop the simulation; the title-bar transport and simulation state remain global.
Open document tabs stay open when you switch, including documents with unsaved
edits. The active task and each task layout are remembered per Twin. A Twin can
declare its initial task with default_perspective in
twin.toml; once you choose a task yourself, that
choice takes precedence when you reopen the Twin.
- View → Reset Layout reapplies the authored default for the current perspective.
- Help → Perspective help explains what the current perspective is for.
- The View menu also has task submenus (Build, Analyze, Editor, Lunica, and General) that open optional panels.
- The Graphs menu action switches to Analyze when that workflow is available.
A guided lesson can temporarily pin the perspective its steps rely on. When the lesson completes or is skipped, normal perspective switching resumes.
View: operate the mission
View gives the live scene the whole window. It is the perspective to use when the task is to watch, drive, fly, or demonstrate rather than author.
The viewport keeps selection, control, and camera targets separate. Selecting an object does not give you its controls, and moving the camera does not change what is selected.
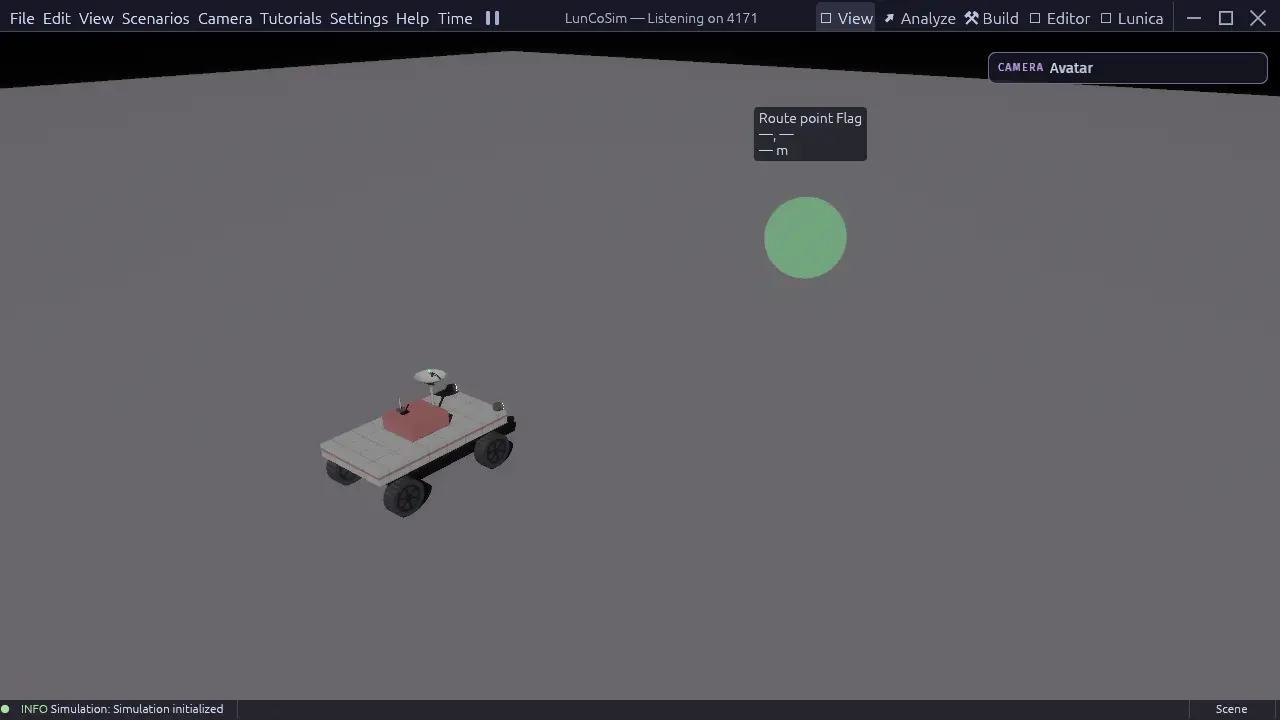
To use it:
- Open a scene or lesson and let the scene finish preparing.
- Click an object to select it, or click an input endpoint to take control of a vehicle or mechanism. In a lesson, use the Take control action when the card offers it.
- Drive with the displayed bindings. The lesson card and the active input map always show the keys configured on your machine.
- Right-drag to orbit and scroll to zoom. The camera keeps its own target.
- Use the transport controls or P to pause when you need to inspect a moment without stopping the app.
Release control with G when you are done; selecting another object does not transfer control. Use View for operating and presenting a Twin. Switch to Build when you need to add or edit scene objects, and to Analyze when you need the signal data behind what you see.
Analyze: read the signals
Analyze is the telemetry and plotting perspective. The live scene remains in the center, Telemetry sits above Entities on the left, Ports is on the right, and Graphs occupies the bottom dock.
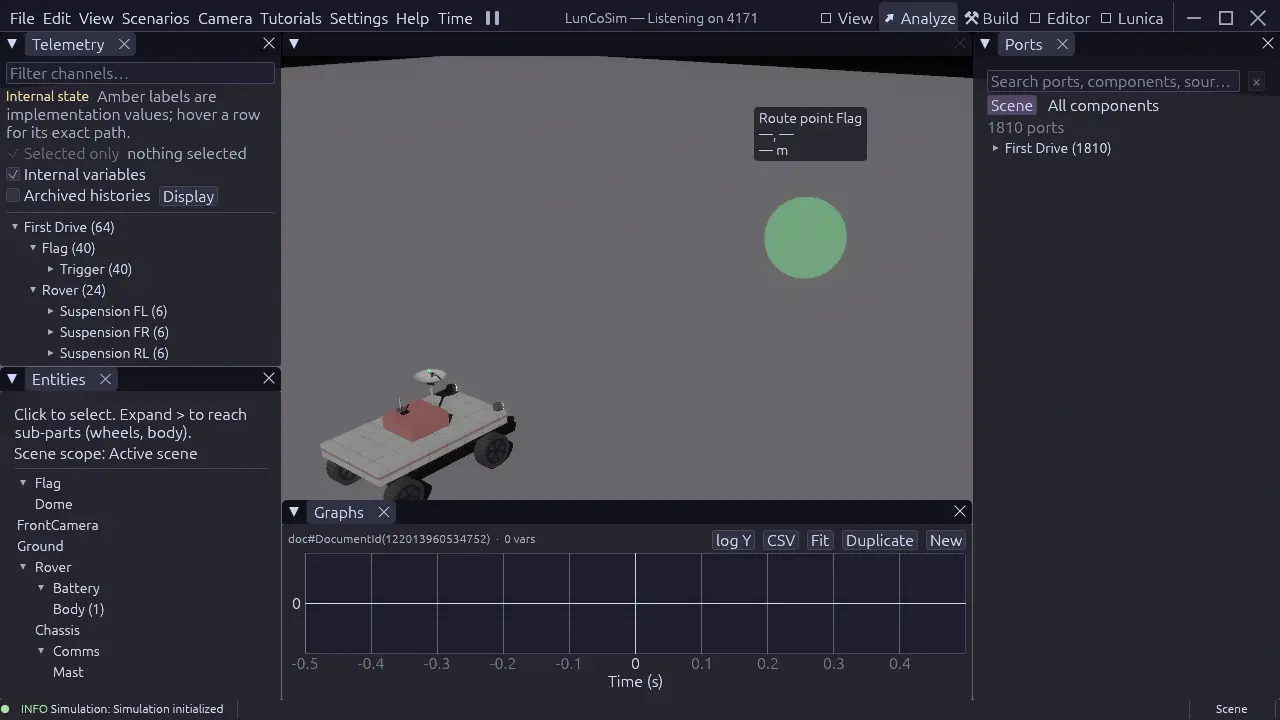
To compare signals:
- Switch to Analyze. If no scene is mounted, Graphs opens in the center.
- Select an entity in Entities, or choose it in Telemetry, to narrow the channel list.
- Check a channel, or drag it into the active plot in Graphs. Add more channels to the same plot to compare them on one time axis.
- Use Ports to read current values and to write manual inputs while the model is running. Use the port's direction and kind: write inputs, read outputs.
- Pause the simulation to inspect the latest sample. The graph keeps the samples it already recorded; it does not replay rendered frames.
Use New in the Graphs toolbar to open a separate plot with its own signal set. If Graphs is hidden, use the Graphs menu or open the optional View → Analyze panels. Graphs is the canonical analysis surface; the same data is also available through the HTTP API when you need to script a check.
Build: compose the live scene
Build is the scene-composition perspective. Entities sits above the Twin file browser on the left, the live scene is in the center, and Inspector and Environment sit above the Spawn palette on the right.
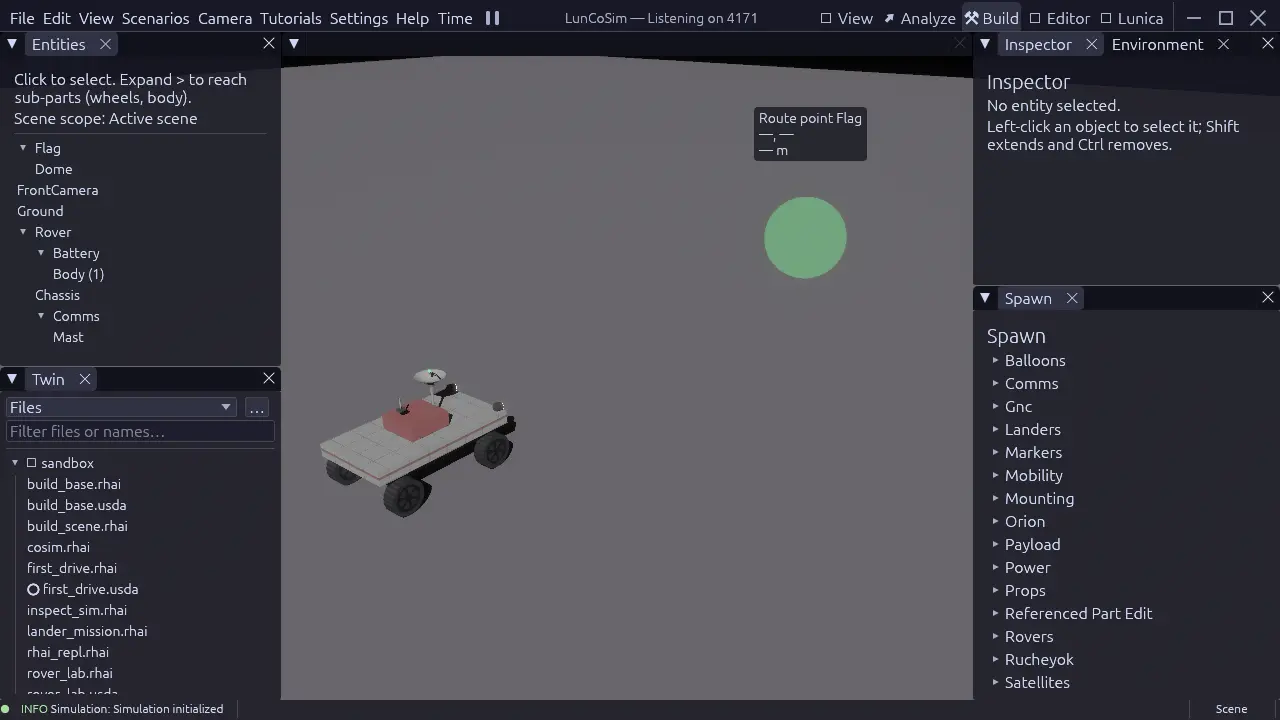
To assemble a scene:
- Open the Twin or scene you want to edit. Build edits the live scene, so the simulation keeps running while you work.
- Select an object in Entities to inspect it, or choose an assembly in the Spawn palette.
- Place the new object, then adjust its transform and properties in Inspector or with the viewport transform gizmo.
- Use Environment for scene-wide settings such as lighting and the environment profile.
- Save the scene document to keep the change in the authored USD stage.
Build is for composing the world from assemblies and entities. When you need to edit the internals of a reusable assembly, open that USD document in Editor. When you need the signal behind a behavior, use Analyze.
Editor: edit one USD document
Editor is the focused USD authoring perspective, also used as the assembly editor for reusable USD components. Twin and Prims are on the left, the document preview is in the center, and Inspector, Requirements, and Change History are on the right. The center stays empty until you open a document or tool.
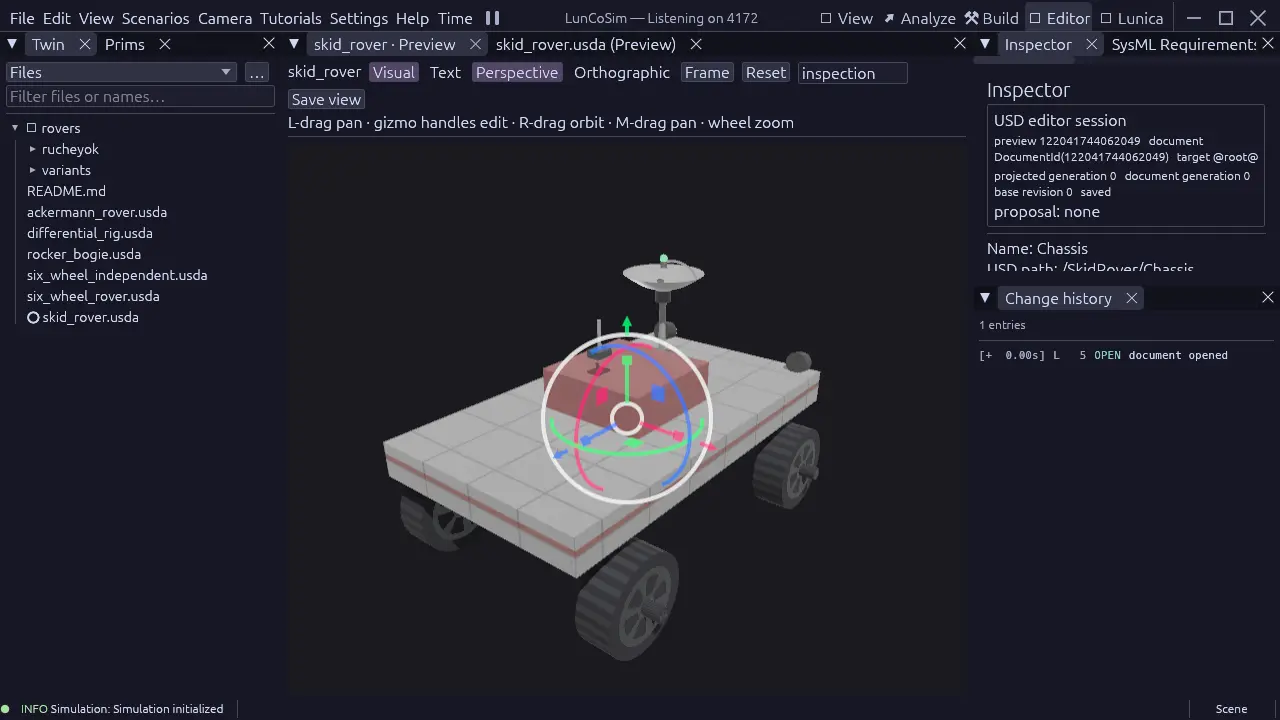
To edit a document:
- Choose a USD file in Twin, or use File → Open. The file opens as an editing preview; it does not replace the live scene.
- Select a prim in Prims or click it in the preview. The Inspector shows the selected prim's properties.
- Edit the value in the Inspector, or switch between Visual and Text to inspect the rendered stage or its USD text.
- Left-drag to pan, right-drag to orbit, middle-drag to pan, and use the wheel to zoom. The transform gizmo edits the selected prim directly.
- Review the journal in Change History. Save and Undo apply to the active document, not to the live scene.
Opening a scene through Scenarios is a world load; opening a USD file in Editor is a document edit. To find a prim's file in the Twin browser, right-click the prim and choose Reveal in Twin.
Editor is the right place for reusable assembly internals, prim hierarchy, materials, and authored properties. It deliberately does not show the live Entity list or Spawn palette; use Build for the composed world.
Lunica: engineer a Modelica model
∿ Lunica is the Modelica perspective. The Twin browser is on the left, and the center holds the Welcome page or the model views you open. Models open in their own document tabs; inside a model, switch between Text, Diagram, Icon, and Docs.
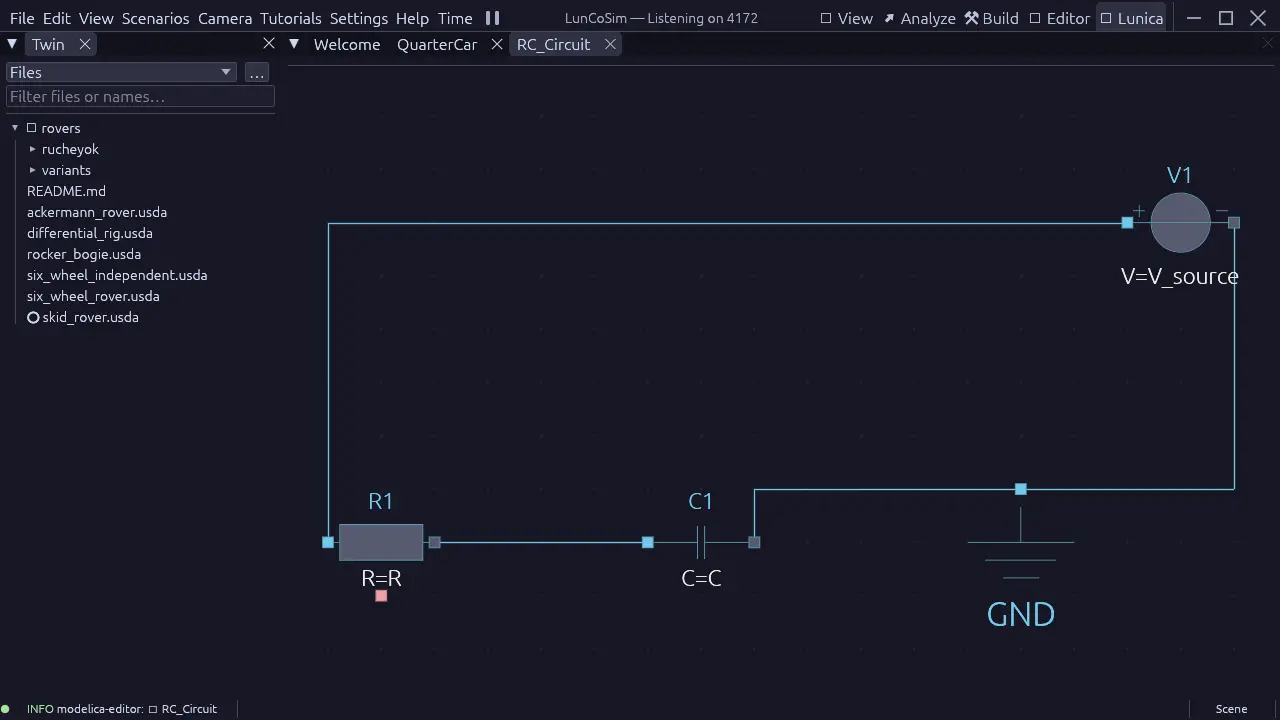
To work on a model:
- Switch to ∿ Lunica, then choose the Modelica section in the Twin browser to browse packages and classes. Open a class to create a model tab.
- Work in Diagram for the schematic, or Text for the equations.
- Choose Compile to build the model. A successful compile leaves the model ready and paused.
- Choose Run to start live simulation, then pause, reset, or restart from the same toolbar. Use Fast Run when you want a batch run that does not need to play in real time.
- Open View → Lunica → Experiments to revisit completed runs and compare their variables. For signals from the running Twin, use Analyze instead.
Lunica edits and runs Modelica; it does not replace the USD scene or the Rhai scenario. Use it to develop the continuous model, then wire that model into the Twin and observe the coupled behavior in Analyze or View.
Choose the right task
| You want to… | Use | Start with |
|---|---|---|
| Drive, fly, or present the running mission | View | Click an input endpoint, or Take control in a lesson |
| Compare telemetry and inspect port values | Analyze | Select an entity, then check a channel in Telemetry |
| Add, place, or tune objects in the live scene | Build | Pick an assembly in Spawn |
| Edit the prims and properties inside a USD document | Editor | Open the USD file in Twin |
| Develop, compile, and run a Modelica model | Lunica | Open a .mo file, then Compile |
Additional task presets, such as Terrain and Keybindings, appear under View → Perspectives but are not pinned to the title bar. A Twin can also add its own perspectives; they appear beside the built-in tasks.
Switching perspectives is part of normal work, not a reset. If a layout feels wrong, use View → Reset Layout for the current task, or open Help → Perspective help to confirm what that task is meant to do.
Continue with First mission for a guided flow. For the full keyboard and camera reference, see Controls.